Quality assurance

In-line monitoring of additive manufacturing processing is indispensable for ensuring high-quality, reproducible part results. At present, possible process errors and part defects can usually only be detected indirectly. The existing systems do not deliver concrete material parameters enabling direct evaluation of part quality during production. Potential defects are hence only found at the end of the production process, lowering the efficiency in terms of raw materials usage, cost, and time.
In the future, in-line analysis should enable defects, such as pores or delamination, to be detected right when they arise in the building process and hence eliminated promptly, yielding higher quality or higher output. At Fraunhofer IKTS, existing and new non-destructive test methods are being researched intensely for various materials and AM methods as well as being further developed for use in industry.
Laser speckle photometry (LSP)


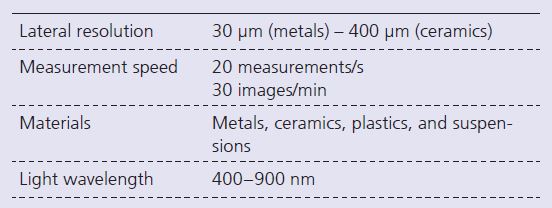
The laser speckle photometry method developed at Fraunhofer IKTS offers special potential for in-line quality assurance for various material classes. The method is based on analysis of the changes in speckle patterns over time by means of a specially optimized algorithm.
Speckle patterns are visible when a rough surface is irradiated with a coherent light source. A spatial structure with randomly distributed intensities, which can be read out by means of a CMOS chip, arises. If the examined object is additionally thermally or mechanically excited, a correlation function can be used to determine the interactions between the speckle dynamics and the condition of the surface. Laser speckle photometry is highly sensitive to out-of-plane and in-plane displacements.
A test system based on speckle sensors is hence capable of detecting concrete material parameters (porosity, stress state, and strength) as well as surface defects during the production process in a non-contact manner. Due to the small amount of data yielded, a high measurement speed and hence real-time analysis of the relevant quality criteria in AM parts are possible. Another advantage of laser speckle photometry is its suitability for use on metals, non-metals, and organic materials.
Services offered
- Characterization of parts made by additive manufacturing
- Process optimization
- Development of test systems from the lab scale to in-line process monitoring for recording of material parameters and surface defects
Equipment
- Various laboratory setups with the components laser/optical, elements/camera/thermal or mechanical excitation – adaptable to a wide range of applications
- Automated laboratory test station with working area of up to 20 x 20 mm² (extendable)
X-ray backscatter tomography
In the quality control of individual components X-ray methods are very common. However, suitable in-line inspections of e.g. very large or compact components could not be performed up to now due to long testing times. Therefore, Fraunhofer IKTS is developing an alternative X-ray backscatter tomography method which is working at a much higher testing speed.
When X-ray beam impacts material, its intensity decreases as a function of the specific material and of the radiation energy. This process generates the imaging effect in X-ray radiography applications. Additionally, the X-ray beam is scattered. This scattered radiation is mostly non-directional. This leads to the possibility to detect the scattered radiation in the opposite direction of the incident beam as well. Using that so-called backscatter effect it is possible to examine large and compact components only from one side.
X-ray backscatter tomography can be used to generate a three-dimensional high-resolution image of a component during manufacturing – contactless and with a high penetration depth for a wide range of materials. Besides the detection of defects such as cracks and pores in different surface layers, unfavorable variations of microstructure can also be characterized. Therefore, the method shows great potential for additive manufacturing of different kinds of components.
Optical coherence tomography (OCT)
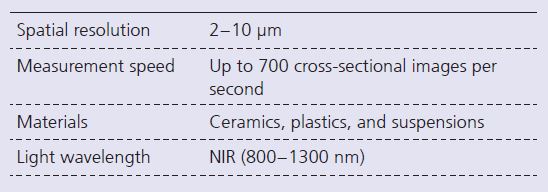
Optical test methods are rapid, non-contact methods that can be adapted very flexibly to different processes. Optical coherence tomography offers special potential for efficient, low-cost integrated monitoring of additive manufacturing processes. The method is especially qualified for this due to its ability to capture information on part surfaces as well as volume information down to a depth of several hundreds of microns.
In OCT, near-infrared light and a combination of interferometric and spectroscopic processing are used for mapping the spatial distribution of scattering intensities. From the 3D information gained, the geometry as well as the internal structure (defects and inclusions) down to the layer-to-layer interface in parts made by additive manufacturing can be depicted. High measurement speeds allow up to 700 virtual cross-sectional images to be taken per second. The recorded volumes of the test object are imaged with a spatial resolution ranging from 2 μm to 10 μm.
With the help of application-specific image analyses, the image data are classified for extraction of quantitative product and defect characteristics. Important quality criteria include the thickness of the last layers deposited, the adhesion between individual layers, the dimensional stability of the part, and the homogeneity of the material.
The multitude of product characteristics that can be supplied at a high frequency enable detailed process monitoring as well as implementation of feedback loops for process control. Errors arising in the production process can be pinpointed rapidly, allowing the necessary corrective measures to be taken or the production process to be aborted. Optical coherence tomography can also be used for non-contact part inspection following the manufacturing process.
Services offered
- Characterization of parts made by additive manufacturing
- Process optimization
- Development of test systems from lab scale to in-line process monitoring
Equipment
- High-resolution OCT system with resolution of 3.5 μm
- Long-range OCT system with resolution of 10 μm
- Various measuring heads with resolutions of 2 μm to 10 μm and scanning fields with dimensions of 5 x 5 mm² to 35 x 35 mm²
- Automated test stations with working areas of up to 400 x 400 mm²
